Source code is at my github repo: https://github.com/raddevus/sqlstone
I originally wrote this up at CodeProject.com and you can check out the full article there: Sqlstone: Every User Owns A Personal Copy of the Database: Solving Backend Challenges (Data Availability / Ownership) – CodeProject
Introduction
I want to write a SaaS (Software as a Service) which:
- requires as little support & maintenance as possible
- is highly available
- solves a problem which real users have
- costs little to run
- earns $$$
Over time I’ve solved many of these challenges. For example, I’ve fulfilled items number one, two and four in the previous list by discovering how to get a .NET Core WebAPI running on a DigitalOcean (Debian-based) droplet (which only costs $6 / month).
Storing Data: Main Challenge
In the modern world of building apps the real challenge lies in the realm of data storage.
Building the front-end is relatively easy and basically requires nothing more than some text files, text editor and a web browser. (Note: I’m not saying that creating a beautiful, functional UI design is easy. I am saying those challenges don’t sit so much in the technology realm (as backend does).)
In contrast, saving data so it is remotely accessible from any device still lands high on the list of difficult technology-based challenges.
Also, this article is somewhat of a Part-2 to my previous article here on CP where I posed the question: How Much Can Sqlite Handle? Multiple Threads Concurrently Inserting Into Sqlite[^]
Making Data Accessible From Any Device
These days, users have multiple devices (iPads, Android Phones, Desktop computers, laptops) and may want to access their data (use your app) from any one of these devices at any given time.
To make data accessible from any device you’re going to need to build some server side software. In addition to that you’re going to need to know how to configure various software (web servers, databases, etc.). You’re also going to have to create a data schema (structures for storing the user’s data). After that, you’re going to need to insure the data is available at all times:
- making sure the web site is up,
- making sure the database is running,
- making sure there is proper connectivity to your app
There are just so many things to do when you attempt to make data accessible from any device and any location.
What This Article Is About
This article is an attempt to simplify those challenges at least a little bit by:
- Creating a reproducible way of providing each user with their own copy of their data
- Making it so the user is able to manage accessibililty to their own data (providing the ability to download their copy of the database & use it in an offline local copy of the associated app.
Technologies Used
To make these things possible, I’ve used the simplest technologies available (what I consider to be the most direct / easy way to store the user’s data remotely):
- .NET Core WebAPI – to post data to remote data store
- Sqlite – text-based database which supports SQL queries (so users can use their data in numerous ways)
- Entity Framework Core – In the past I never used EF because it felt bad & I like to create my own Stored Procs. However, Sqlite doesn’t support Store Procs anyways and the SQL used for this project is extremely simple & it makes sense to use EF Core. Also, once you start using EF you kind of get addicted to it, because it is so easy.
What Will the WebAPI Framework Provide
I’ve used these two technologies to provide a framework of sorts which a developer can quickly build upon to create the specific target SaaS to create end-user apps.
Example Target App
An example target app (wrapped up in my extremely small “framework”) is a Daily Journal app which allows the user to store daily free-form notes of activities they accomplished, ideas they have, etc.
Sqlstone: The Importance of a Project Name
One of the first things you need, when starting a project, is a cool / unique project name. To create a cool and unique project name, you should put words together that don’t necessarily make sense.
That’s whay I’ve named this project Sqlstone. See how it confuses you and inspires confidence that this will be a huge Open Source Project?
Daily Journal App: Try It Online
I’ve built an extremely basic version of a Daily Journaling app (on top of Sqlstone) and we’ll use that code to show how this idea of each user getting his own database will work.
You can try the app out where it is running on my web site: https://newlibre.com/journal^
I will walk you through the steps of using the Daily Journal app, but first let’s talk about the simple Sqlstone Framework to discover what it can do for your app.
Sqlstone Summarized
The main thing the Sqlstone project does for you is:
Copies your custom Sqlite DB to the user’s File Space (on your web server).
Where Is User’s File Space Located?
wwwroot
For .NET Core WebAPIs and MVC apps the projects create a wwwroot folder where web content is served from.
UUID Folder Name
Underneath that folder, the Sqlstone code will create a uniquely named folder based upon a UUID.
That folder will be created for the user when she register’s her UUID (which is generated by the target app). You’ll see all of this with associated screen shots when we walk through the Daily Journal app further along in this article.
What Does the Sqlstone Code Do?
Almost all of the code for Sqlstone is implemented in the UserController.cs class.
When the user posts to the UserController to register her UUID the system will call the RegisterUser API method. When that method is called, the UserController constructor will run and configure a few items.
Let’s take a look at the UserController Constructor because it helps illuminate a few things.
public UserController(ILogger<UserController> logger,
            IConfiguration _configuration,
            IWebHostEnvironment webHostEnvironment)
    {
        _logger = logger;
        templateDbFile = _configuration["templateDbFile"];
        Console.WriteLine($"content rootPath: {webHostEnvironment.WebRootPath}");
        webRootPath = webHostEnvironment.WebRootPath;
        contentRootPath = webHostEnvironment.ContentRootPath;
    }
Two Injected Interfaces Are Used
The default Controller normally just has the one ILogger parameter. But, in our UserController I’ve injected two Interfaces:
- IConfiguration
- IWebHostEnvironment
I’ve added those so that we can:
- Read values from our App configuration (set in the
appSettings.jsonfile in the project). - Read some WebHost environment settings that we will use so we can store a fresh copy of the target solution’s Sqlite Database in the user’s file space.
AppSettings.json: templateDbFile
The templateDbFile is the file which will contain all of the tables which the target project (the project you are building on top of Sqlstone). In our case, this will be the database for the Daily Journal App.
Here’s the entire contents of the appSettings.json file as it is defined in the source code for the Journal app.
{
  "Logging": {
    "LogLevel": {
      "Default": "Information",
      "Microsoft.AspNetCore": "Warning"
    }
  },
  "AllowedHosts": "*",
  "templateDbFile": "sqlstone_journal.db"
}
The Logging section contains the default values that are included in .NET Core MVC apps.
The value we want to focus on here is the templateDbFile which I’ve set to be: sqlstone_journal.db.
This is the value which is read from the UserController constructor on the following line of code:
templateDbFile = _configuration["templateDbFile"];
That allows us to use whatever value we want to use to refer to the target database.
In the constructor we load the value into a member variable so we can use it later (in the RegisterUser() API call).
IWebHostEnvironment: Getting Paths
Now, we need the paths that we’ll use to:
- copy the database template file from
- copy the database to the user’s UUID folder
Because we’ve injected the IWebHostEnvironment into our constructor we can now get the:
webRootPath: path to web root (this is basically the folder above the wwwroot — this is the locaton where the web binaries of your solution are deployed tocontentRootPath: path to the wwwroot folder (all content is served from wwwroot folder)
Now that we have an idea of those items which are set, we can talk about what happens when a User registers his UUID.
User / UUID Registration
For a user to use an app which is built on top of this very simple Sqlstone framework they will have to register a UUID.
Registering Creates User File Space & Personal Database
This will be required for all Apps built on top of Sqlstone, because this will :
- Create the User’s File Space (under the wwwroot directory). The directory will have the format of
wwwroot/<UUID> - Copy a fresh instance of the target Sqlite database into the user’s
wwwroot/<UUID>directory.
Very Simple Identification
Registering the UUID creates a very simple way to identify which database the User’s content will be stored in.
Yes, this means there are no passwords (at this time) required to store data in the target database. We will discuss this further later. (Hint: At some point in a future article, I will even show you how to encrypt each user’s data using Authenticated AES256 encryption.)
Keeping the Main Idea, The Main Focus
For now, understand that this is a prototype to discover if this method of allowing every user to have their own copy of their own Sqlite database works well or not.
Work Flow of Steps When User Registers UUID
Here’s the entire RegisterUser() method which takes a String which represents the user’s UUID.
[HttpPost]
    public ActionResult RegisterUser([FromQuery] string uuid){
        Console.WriteLine($"uuid: {uuid}");
        User u = new User(uuid);
        var ipAddr = HelperTool.GetIpAddress(Request);

        var userDir = Path.Combine(webRootPath,uuid);
        var journalDb = Path.Combine(contentRootPath,templateDbFile);

        Directory.CreateDirectory(userDir);
        var userDbFile = Path.Combine(userDir,templateDbFile);
        Console.WriteLine($"userDbFile: {userDbFile}");
        if (!System.IO.File.Exists( userDbFile)){

            try{
                Console.WriteLine($"{journalDb} \n {userDir}");
                System.IO.File.Copy(journalDb,Path.Combine(userDir, userDbFile));
            }
            catch{
                return new JsonResult(new {result=false, error="Couldn't register user. Try again."});
            }
            UuidInfo info = new UuidInfo{Uuid=uuid,IpAddr=ipAddr};
            UuidInfoContext uuidCtx = new UuidInfoContext(contentRootPath);
            uuidCtx.Add(info);
            uuidCtx.SaveChanges();
        }
        else{
            Console.WriteLine("User is already registered.");
        }


        return new JsonResult(new {result=true, directory=webRootPath, ip=ipAddr});
    }
Here is basically what happens during User Registration.
- Get the UUID from the data posted by the user. Yes, in this case I have the client generate the UUID. (I’ll show you the JavaScript that does that further down in the article.) I can easily have the .NET C# code generate the UUID but I just arbitrarily decided to put this on the client side. If you want it that way, you can easily convert this method to do the work on Server side.
- Get the IpAddress so we can track the IP address which registers each UUID. I do this just so I can control an attack of someone generate thousands of UUIDs (and resulting folders).
- Create the User’s File Space (UUID directory under wwwroot) if it doesn’t exist.
- Check to see if the UserDbFile already exists in the User File Space. If the template file has already been created, we obviously don’t want to overwrite it.
- If User’s db file doesn’t already exist then copy the template one found at
webRootPath\sqlstone_journal.db - Create the
UuidInfoobject, a simple object which wraps up theUUID,IpAddress, andCreateddate. - Store UuidInfo data in the
sqlstone.db. Thesqlstone.dbis only accessible to Admins of the Sqlstone framework. It’s just a simple way to determine how many users have registered to try the project out.
That’s it. Once the User is registered, she will be able to use the rest of the system. I’ll walk you through using the Journal App so you can try it at my web site (or by downloading the code and trying it locally).
But, first, let me explain a bit more about the Database Template file.
A Bit More About The Database Template File
The database template file (sqlstone_journal.db) is an empty database which contains only the table schemas for your target project.
For the Journal App we only have one table, named JEntry (Journal Entry), in the database which is defined in the following way:
CREATE TABLE [JEntry]
( [ID] INTEGER NOT NULL PRIMARY KEY,
  [Title] NVARCHAR(250) check(length(Title) <= 250),
  [Note] NVARCHAR(3000) NOT NULL check(length(Title) <= 3000),
  [Created] NVARCHAR(30) default (datetime('now','localtime'))
  check(length(Created) <= 30),
  [Updated] NVARCHAR(30) check(length(Updated) <= 30)
);
You can find that definition in a file in the project source code, in the sql folder.
In your target solution you will have a different set of tables which will be used by your target app to store its data. Then you’ll place your database template file (containing only tables & no data) in the webRootFolder (folder above wwwroot) and each time a user registers to use your target app, the template database will be copied to her wwwroot/<UUID> folder so that her data will be saved in her own private copy.
Now that we’ve discussed the basics of how this very small Sqlstone framework operates, let’s take a look at a solution that is built on top of it.
Journal App: Built On Top Of Sqlstone
You are probably thinking, “Hmm…this is a very simple idea. All he is doing here is giving every user their own Sqlite database.” You are right. It’s very simple. Now I want to know if it is feasible to use in a true poduction environment. I think it’ll work.
Here’s the current (simple & basic UI) of my Journal App.
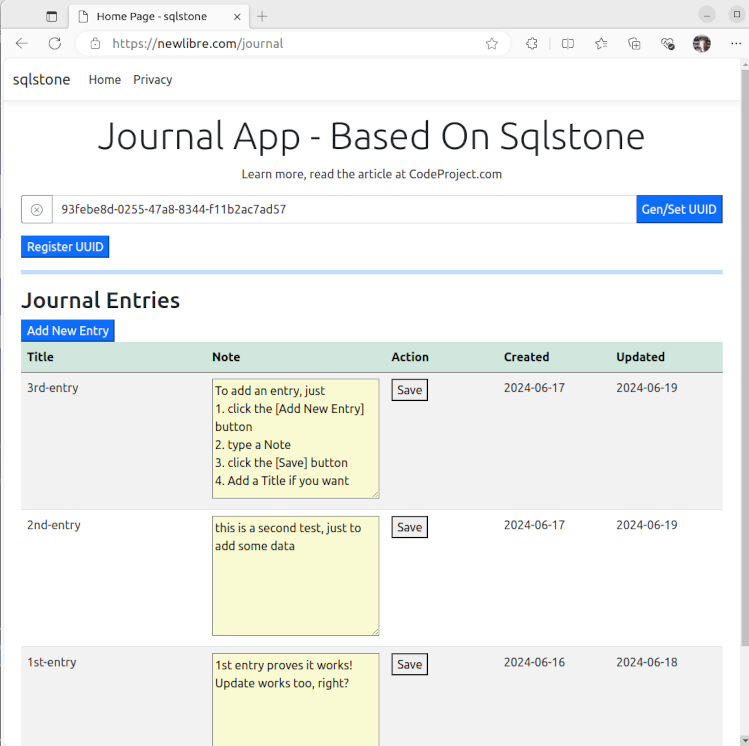
That’s a snapshot, after the user has already:
- registered a UUID
- Added some data
Before Registering a UUID
However, when you visit my web site and the Journal App loads (https://newlibre.com/journal^) or run it locally, you’re going to see something different, since your UUID won’t be registered yet.
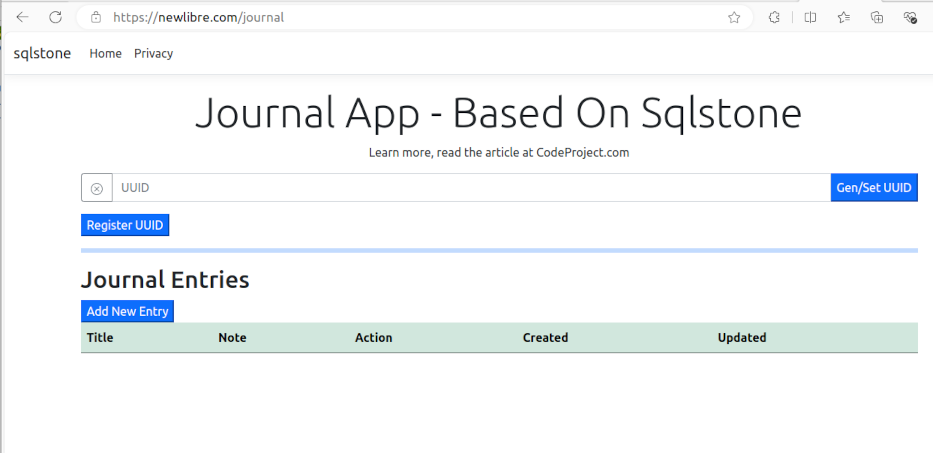
As you can see, the user has not generated or registered a UUID so there is not much here.
Generate and Set A UUID
To begin, click the [Gen / Set UUID] button.
That will:
- Generate a brand new
UUID - Store it in your
localStorage(now any time you visit this page from this device and browser you’ll see thatUUID). - Display it in the
UUIDtext box.
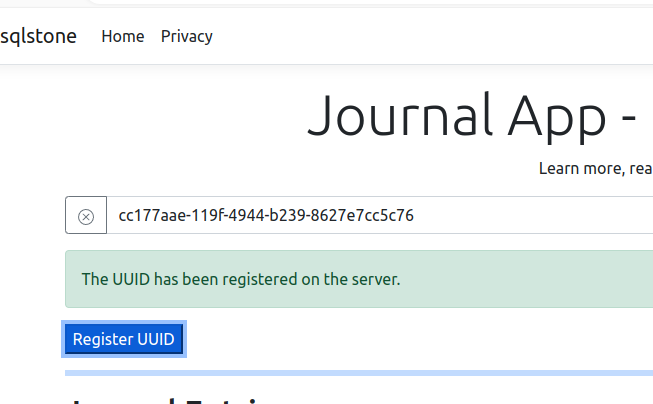
Register Your UUID
You now have to click the [Register UUID] button to post the UUID to the server so it can create your user file space and copy the database template file to that space.
The client-side UI will let you know that the UUID was registered with a temporary alert:
Now you can create your first Journal Entry.
NOTE: The Journal App will not allow you to create a new Journal Entry withou first Generating and Registering your UUID.
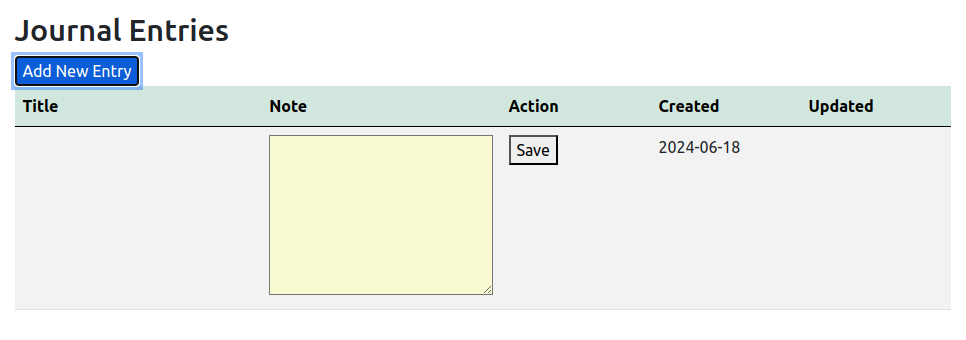
Create Your First Journal Entry
Now that you’ve registered your UUID and your remote file system space is created, you are ready to create a Journal Entry.
Click the [Add New Entry] button and you’ll see a blank entry appear.
 Fill out the
 Note field (an HTML TextArea) with some text. You can even save emoticons if you want.
Click the [Save] button to POST the data to the web site and save it in your copy of the sqlstone_journal.db.
When you click the [Save] button, a Prompt dialog will popup so you can add a Title if you want.
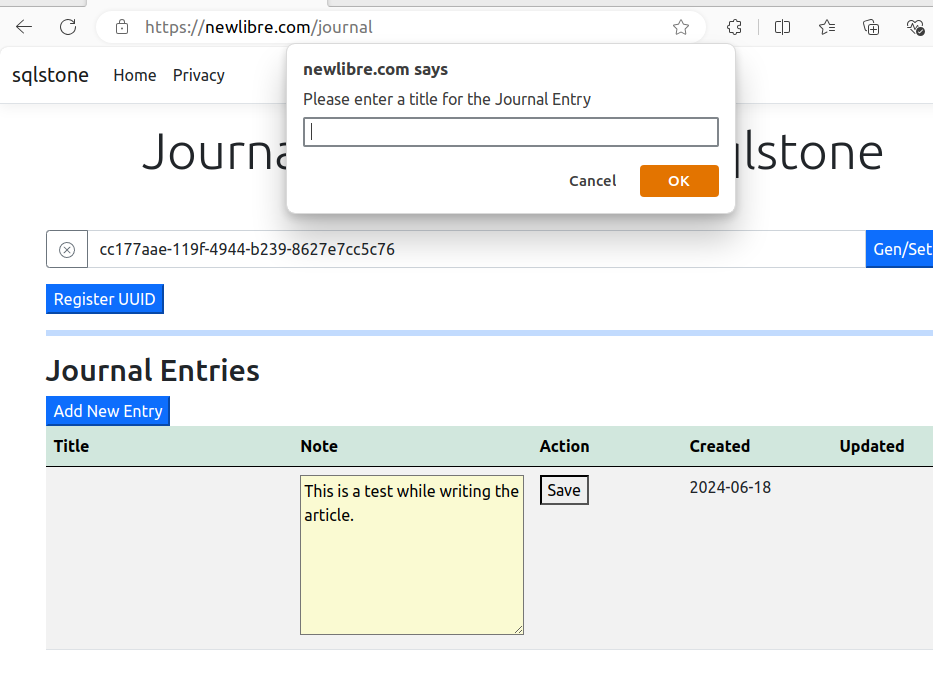
To save a Title, just type some text in the Prompt field and press <ENTER> or click the [OK] button.
If you don’t want a Title to be saved, then you can click the [Cancel] button or hit the <ESC> button.
Your data will be posted to the web site and stored in your Sqlite database.
Again, you’ll see an alert stating that the data was saved.

You Can Edit Your Data Too
If you want to change or add to the Note field or just add a Title, then just make your changes and click the [Save] button again. This time the data for the record will be updated in the database.
If you do Update the data, then the Updated field will show a date when you last updated.
More to come, soon.