Introduction
While attempting to document a repository pattern that will provide a process for getting your domain objects to write themselves to SQL Server database, I found there are many challenges in interacting with SQL Express.
There are a number of tools you can use :
- SQLLocalDb (command-line tool)
- SqlCmd (command-line tool) Previously I excluded this section of the article but I’m adding it back in. SqlCmd can be a helpful tool to use to create tables, add stored procs and even query your database. There are some tricks to using it and I detail them in the added section at the bottom of this article (click to jump).
- built-in Visual Studio support
- SSMS (Sql Server Mgmnt Studio)
However, each of these present their own challenges.
I also discovered that I have numerous versions of SQL Express installed on my computer (auto-installed by various versions of Visual Studio) and creating a database in one may make that database inaccessible by other versions.
I’m writing this article in an effort to detail all of these challenges and provide a process you can use to quickly:
- create your domain objects
- allow domain objects to write their data to sql server
- create an easy way to share your project and db schema (tables, stored procs, etc) with another user so they can run your code on their own LocalDb. This is great for development and testing because each person can have her own copy of data and not corrupt / change other users’ data.
E. M. Forster (novelist)How can I know what I think, until I see what I say.
One of the main reasons I’m writing this up is because I’ve dealt with it numerous times and I wanted to see if I could document it for re-use so I don’t have to learn it again a number of times as I often do. 🙂
Written As A Walk-Thru
I’ve written this as a walk-thru with numerous screenshots so you can simply read over it and get the parts that might be useful to you without having to try every single thing.
Background
A core issue with writing code is getting it to serialize itself to the database to save domain objects.
While attempting to get this all working I’ve stumbled upon some difficulties which are related to using various versions of Visual Studio and the associated tools (SQL Express, sqllocaldb (command-line tool), sqlcmd (command-line tool) and the Visual Studio built-in Server Explorer functionality which allows you to access your databases.
I want to detail each of the challenges and provide a solid work-around for getting your project to write to SQL Express as easily as possible.
What I Was Looking For
I was attempting to create a process that would allow me to do the following as easily as possible:
- Create a database
- Add domain objects (as tables)
- CRUD (Create, Read, Update, Delete) data via Stored Procs
- Share my projects with associated database (especially for articles on CP)
Create A Database Using Visual Studio 2017
Did you know you can create a database using Visual Studio 2017? All you have to do is:
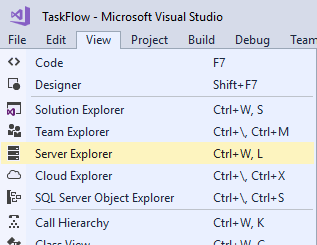
1. In your Visual Studio project, go to Server Explorer (see image) – (Choose the View menu item and you’ll see the Server Explorer option)
2. A treeview will appear in Visual Studio and you’ll see a [Data Connection] node. Right-click the [Data Connection] node and a menu will appear. (see image below)

3. Choose the [Create New Sql Server Database…] menu option that appears.

4. You’ll see a new dialog pop up (and this is where it gets weird).

5. If you drop the [Server Name] list you will see that it is empty (as it is in mine). However, that is not entirely correct. If you have Visual Studio installed then you have some LocalDb servers (SQL Express) instances available.

SqlLocalDb Command Line Tool
Now, let me show you how to prove that there are some Sql Server Express intances available even though they are not listed in that dialog. After that I will show you how to connect to those Sql Server Express (localdb) instances.
We need to use a command line tool that is installed with Visual Studio (even though a lot of users don’t know it is installed).
Command Prompt – Determine If you Have SqlLocalDb Tool
If you have Visual Studio 2013 or newer (or maybe even an older edition) you should be able to open a command prompt and type :
c:\> sqllocaldb<ENTER>
When you do that you should see a bunch of information about how to use the tool scroll by. It’ll look something like:
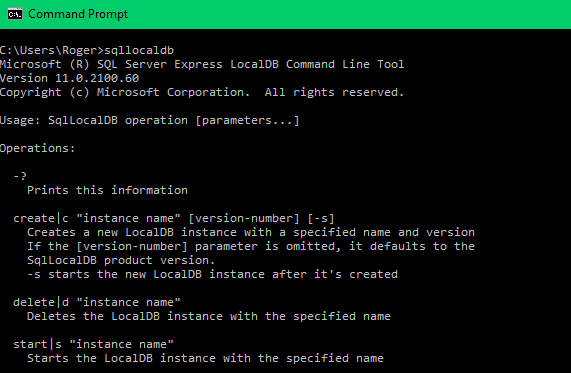
If it doesn’t work you’ll get an error something like:
'sqllocaldb' is not recognized as an internal or external command, operable program or batch file.
Check Your Path
It could just be that your path doesn’t include the directory where the app is installed so you can check that. Look in C:\Program Files\Microsoft SQL Server\110\Tools\Binn on 64 bit machines.
There is a lot to determining whether or not the tool is installed so for now I’ll just continue this talk as if you do have the tool installed and you are able to run it.
Using SqlLocalDB To Determine What You Have
Go ahead and run the following command:
sqllocaldb v<ENTER>
Notice that there are no slashes are dashes used in commands with sqllocaldb. If you use them, you’ll get error messages. It is very odd that MS broke this convention.
When you run that command SqlLocalDb will display the versions of Sql Express that are installed on your system.
Mine looks like the following:

I really don’t like the versioning. It’s quite annoying because the version numbers are so close to matching the product name but do not actually match. 2012 is v 11. 2014 is v 12. Whatevs! It creates confusion.
Determine What Server Instances Are Running
Now, let’s determine what Sql Express Server instances are available to run with the following command:
sqllocaldb info <ENTER>
Mine looks like:

That is a listing of available Server intances. Don’t get those confused with available databases.
Oddly Named Instances
They have confusing names and the names pertain to the version of the Sql Server Express engine that backs them.
This is how mine line up:
v11.0 == Microsoft SQL Server 2012 (11.0.3000.0)
ProjectsV12 == Microsoft SQL Server 2014 (12.0.2000.8)
MSSqlLocalDb == Microsoft SQL Server 2016 (13.0.1601.5)
Also, please note, I created the one named ProjectsV12 but normally the one based on Sql Server 2014 is named v12.0.
sqllocald db can provide you with information about each instance by using the info command with the instance name, like the following:
sqllocaldb info v11.0<ENTER>

You can see that now the info command tells us that this specific instance is actually running. It also provides us with the named pipe that we can use to connect to the server instance using SSMS (Sql Server Management Server).
However to connect to this database using Visual Studio, you need to use the instance name. This is all part of the confusing of using these local databases, because the connection method is a bit different depending upon the tool you use.
First let’s take a look at the one named MSSqlLocalDb, which is the one that was added by Visual Studio 2017 when I created a local database from a project which used a file based database MDF.
You can see that this one’s State is : Stopped because it isn’t running yet. Let’s go walk through how to connect to this instance using Visual Studio.
Connecting To Local Instance Via Visual Studio
Again, over in Visual Studio, the first thing you need to do is go to Server Explorer.
Next, right-click the [Data Connections] node and choose the [Add Connection…] menu item.

When you do that a dialog box will pop up.
First, make sure you choose the [Microsoft SQL Server (SqlClient)] option in the Data Source box — the first one shown. Use the [Change] button if necessary.
Next, type the following into the [Server Name] text box:
(LocalDb)\mssqllocaldb
In this case we always use (LocalDb)\ and then the instance name we want to connect to.
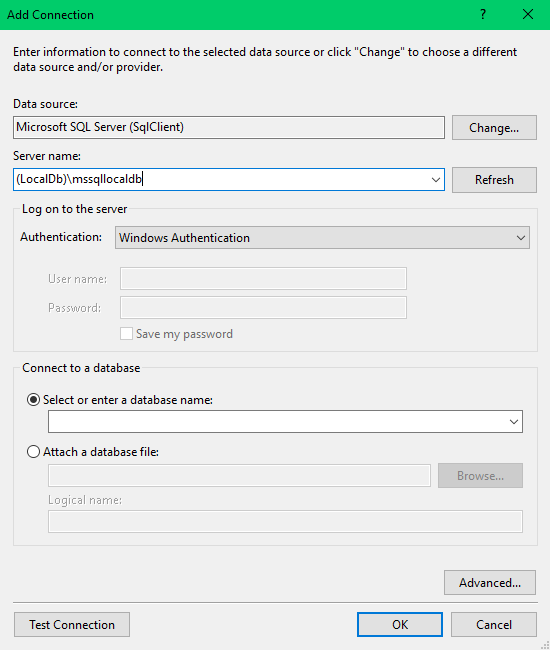
Once you type that in correctly, you can move down the dialog box and open the list of database names (see next image). If you’ve typed the connection properly at the top you will see it warning you that it is loading and you should see that it finally at least lists the master database which is a default database.

Once you see one appear, go ahead and choose it. I’m choosing Master database in my example. Once you do that, you can click the Test Connection button and you should see a message saying that it was successful.
After that, click the [OK] button and the new connection will appear under Server Explorer.

Now you can work with the database, adding tables, store procedures, and also query the database.
Open A Query Window
To open a query window you simply right-click the new connection and choose [New Query].

It’ll open up a new document in the main portion of Visual Studio and you can query the tables. Unfortunately in the Master database there are no tables or stored procs created.
Create A New Table
Of course, it is easy to add a new Table to your schema using Visual Studio. You can right-click the [Table] folder item under the connection and choose the [Add New Table] menu item.

When you do that, you’ll see the familiar designer view that you’ve probably seen in Sql Server Management Studio. Although the Visual Studio version is a bit less helpful.
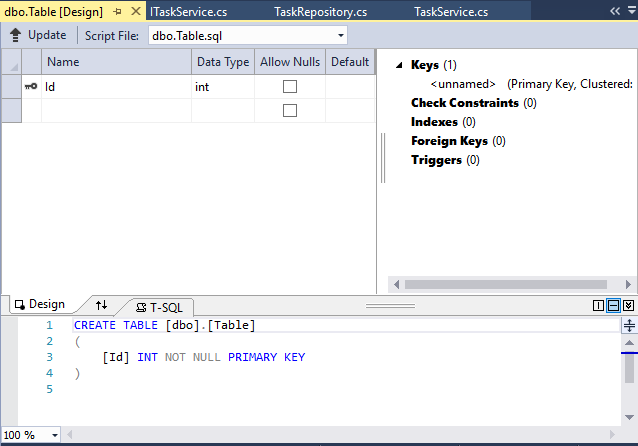
You can see that the top gives you a way to enter your field names, types, whether it can be set to null and the default value. Then, the bottom window displays the SQL DDL (Data Definition Language) which will be used to create the table.
Adding An Identity Field
I noticed that there is no easy way to make a field an Identity field which will automatically generate new values. I found that I needed to add the code to the DDL (Data Definition Language) for the table create to do that.
It’s not much to do, but you need to add IDENTITY(1,1) which means make this an identity field and autoincrements and starts at value of 1 and increments by 1.
It looks something like the following :
CREATE TABLE [dbo].[Task] (
    [Id]          INT            IDENTITY (1, 1) NOT NULL,
    [OwnerId]     INT            NOT NULL,
    [ProjectId]   INT            NULL,
    [AssigneeId]  INT            NULL,
    [CategoryId]  INT            NULL,
    [Title]       NVARCHAR (50)  NOT NULL,
    [Description] NVARCHAR (MAX) NOT NULL,
    [Created]     DATETIME       DEFAULT (getdate()) NOT NULL,
    [Updated]     DATETIME       NULL,
    [Completed]   BIT            DEFAULT ((0)) NOT NULL,
    [Active]      BIT            DEFAULT ((1)) NOT NULL,
    PRIMARY KEY CLUSTERED ([Id] ASC)
);
This creates a table named Task that I’m going to be using in my ongoing example. You can see I added the identity (the bolded part) into the table create. It’s very easy but a bit annoying that there is no UI menu item that will help you do that.
The Problem I Want To Solve With This Article
Now we are at the place where I can more easily talk about the problem I want to solve for this article and for the future articles I will write which will include a database. Here’s what I want to be able to do:
Problem Statement
I want to be able to provide a sample database that the user can easily connect to so she can query my data.
Let’s look at how you can create a database file in Visual Studio and see if that will help us solve this problem.
Add A File Based Database (MDF)
We are going to add a file based database to show you how you can create a database which can be copied around and used locally by anyone. First I will show you how to create the database and then I’ll show you how to share it with others so they can get a copy and use it as their own.
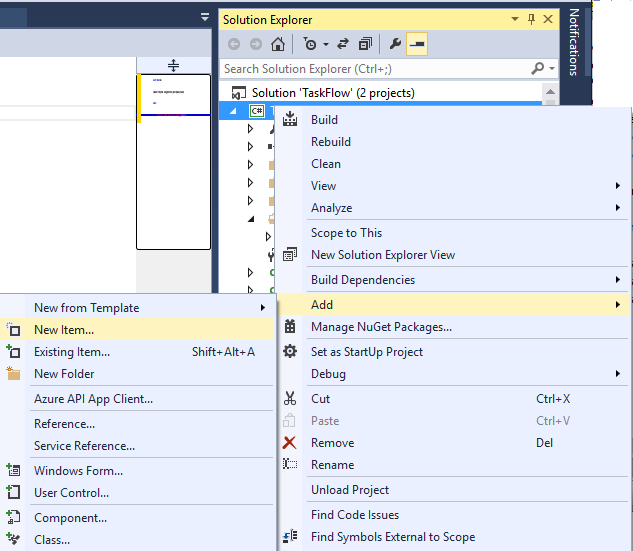
Go to Solution Explorer and right-click your project and float over the [Add] menu and then choose the [New Item...] which pops up.
When you make that selection you will see the normal Add New Item dialog. We want to make sure to choose the [Data] node on the left side. When that is chosen you will see that we can then choose the (oddly named) [Service-based Database] on the right.
When you highlight that item on the right, you will see that Visual Studio offers a default name (Database1.mdf) for the database. However, notice that there is no way to tell it where (file path) to save your new MDF file. It’s quite annoying really.
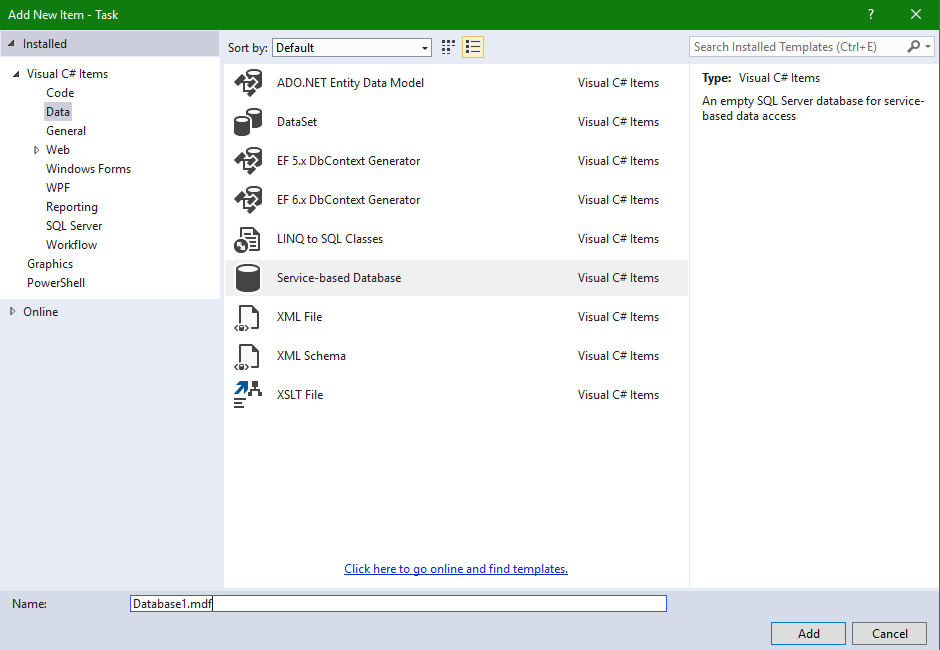
I’m going to name mine maintask.mdf for this article. After I name it, I simply click the [Add] button and Visual Studio will then add a new connection in Server Explorer. I’m not sure why it shows that red [x] (disconnected) initially. However, all you have to do is click the arrow next to it and you’ll be connected.


Of course, there are no tables or anything else added to this database so I will run three scripts to :
- add 1 table named Task
- add 1 stored proc named spGetAllTasks
- add one insert into the Task table
I’ll add those scripts as downloads to this article in a file named SqlScripts.zip. You’ll find three separate .sql files in there that you can use to try this too.
You will want to run them in the following order:
- Task_TableCreate.sql — create the task table
- spGetAllTasks.sql — create the spGetAllTasks stored proc
- Task_TableDataLoad.sql — load task table with one row of data.
Once you have those scripts you can just right-click any of the folder nodes in Server Explorer under the maintask.mdf and choose the [New Query] menu item.

New Document : Choose Database
When you make that selection, Visual Studio will open up a new document on the right. Take a close look at the new menu bar that is at the top of that document. It will contain a drop list that will most likely be set to “master”.

That is indicating that any queries you do will run against the master database in your newly created maintask.mdf. We do not want to run our scripts on that database.
Any scripts you run would run against the master database. We want our scripts to run against the database we just created which has a very odd name you will be able to see in the drop list. It is a complete path to the location where Visual Studio created your database file.
Mine looks like the following. I want to choose the one with the long path so my table, stored proc and data are added to my file database.

Once you do that you can copy the text of each of those files into the window and run it separately. Doing so will create the table, the stored proc and then add data to the task table.
You could also simply run all of them as one batch if you like, but you’d have to add a go statement between each so they’ll all run. If you want you can copy the following entire script and run it.
CREATE TABLE [dbo].[Task] (
    [Id]          INT            IDENTITY (1, 1) NOT NULL,
    [OwnerId]     INT            NOT NULL,
    [ProjectId]   INT            NULL,
    [AssigneeId]  INT            NULL,
    [CategoryId]  INT            NULL,
    [Title]       NVARCHAR (50)  NOT NULL,
    [Description] NVARCHAR (MAX) NOT NULL,
    [Created]     DATETIME       DEFAULT (getdate()) NOT NULL,
    [Updated]     DATETIME       NULL,
    [Completed]   BIT            DEFAULT ((0)) NOT NULL,
    [Active]      BIT            DEFAULT ((1)) NOT NULL,
    PRIMARY KEY CLUSTERED ([Id] ASC)
);
go

CREATE PROCEDURE [dbo].[spGetAllTasks]
AS
    SELECT * from Task;
go

insert into task
(OwnerId, ProjectId, CategoryId,Title,[Description],Created)
values
(1,1,1,'First Task','Sample task for use in testing',getdate());

go
If you ran each of them correctly you should see a message telling you that the script was successful. If you attempt to run either of the first two scripts twice then you will get an error that the object (table or stored proc) already exists.
Testing That the Tables and Data Were Added
If everything went right you should see a new table under your Table node in Server Explorer. You will also see a new Stored Proc under the Stored Procedures node.
If you do, then you can clear your query window (so you don’t run the commands again) and type just the name of the new stored proc and run it. It should return our one row. It’ll all look like the following:

Notice the result set in the bottom window displays the row we inserted into our Task table.
Close, But No Cigar
However, this still isn’t exactly what I want. This is a great way help another dev user get a database setup, but what I would really like is to provide the MDF file with the tables and data and let the dev user attach to it and use it.
There’s another thing to mention here that will help you find the physical database file. When you click the maintask.mdf in Server Explorer then Visual Studio will display some information about it in your Properties dialog. It’ll look something like the following (I moved my Properties dialog closer to Server Explorer for this pic. Yours will be somewhere else):
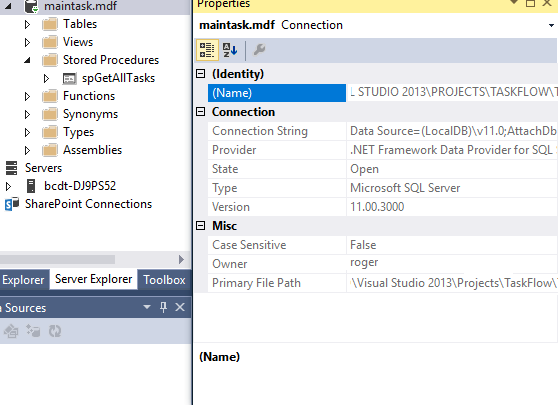
There’s a lot of helpful information here. First of all we can see that it is using version 11.00.3000 of the SQL Express engine. We also see that datasource connection is using (LocalDb)\v11.0 (yours may use a different on depending upon which version of Visual Studio you are using).
Copy MDF File For Later User
We can also copy the path from primary file path so we can copy the MDF file if we want to, so we can share it.
However, to be able to copy the file you will have to right-click on maintask.mdf in Server Explorer and disconnect from it, otherwise you will be warned that the file is in use.
Stop The Database Server
That is actually not correct. I just tried it and it failed. I believe the real problem is that we need to stop the v11.0 instance of the database server. To do that, we’ll need to use SqlLocalDb command line tool.
Hopefully, you were able to run SqlLocalDb earlier when we tried it. Go ahead and open up a command prompt again and try the following:
sqllocaldb p v11.0<ENTER>
When you do that the database server (sql express) for that version will be stopped. Yes, p means stop, because they already used s for start. If it’s successful, you will see something like the following:
LocalDB instance "v11.0" stopped.
Your Database Server Instance May Be Different
Also, keep in mind that the name of your database server may be different. It’s the name, back in the Properties dialog that comes right after the (LocalDb)\ portion. Or, you can type the following to see the list of SQL Express instances that are on your machine (as we did earlier):
sqllocaldb info<ENTER>
Once you are able to stop the database instance, you will be able to copy the two files (db and log file) wherever you want to copy them so that you can share them.
The two files are named:
maintask.mdf— data filemaintask_log.ldf— log file for database
I will zip those files up and add them as a download so you can try connecting to them on your machine.
Now you can share your database with anyone simply by giving them those two files.
Connect To A Database File Using Visual Studio
Here’s how you will connect to the database again using Visual Studio.
1. Right-click on the [Data Connections] node in Server Explorer.
2. Choose [Add Connection…]

The dialog box will pop up.
3. This time we want to choose Microsoft SQL Server Database File (SqlClient) in the top drop list.
4. Next we click the [Browse…] button and navigate the the location where the MDF file exists (of course the LDF file will be there also, but you won’t see it. Download the maintaskDB.zip from the top of this article.
It will look something like the following:

Once you have it set up, simply click the [OK] button and Visual Studio will add the connection to Server Explorer.
2013 Versus 2017 : SqlExpress SQL Engine
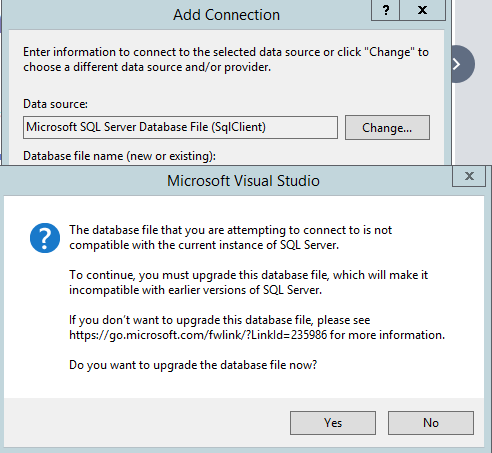
Right after I published this article (of course) I tried opening this database file using Visual Studio 2017. It was created using Visual Studio 2013 which uses the v11.0 database engine.
If you use Visual Studio 2017 and attempt to test your connection to the database you will see something like the following:
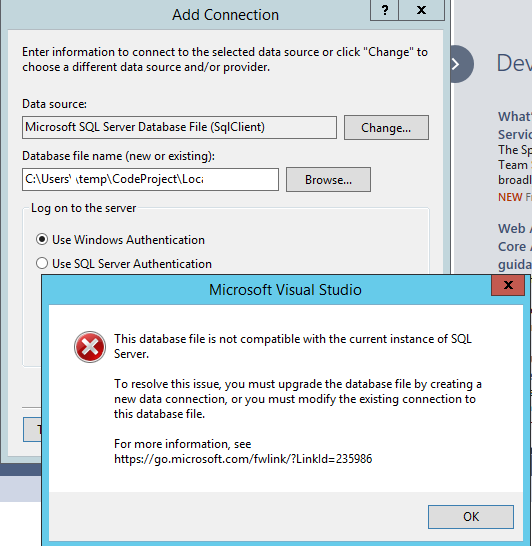
All you have to do to run the upgrade is click the [OK] button and it will request you accept the update with the following dialog. Click the [Yes] button to confirm your choice and it’ll take care of it. After that, everything else will be the same.
Go ahead and open a New Query window and run the stored proc or run a select statement against the Task table and you’ll have the data.
Sql Server Management Studio (SSMS)
One last quick item. If you want to use SSMS to connect to this file database you’ll need to know the named pipe that it listens on. To do that, again you need to run the sqllocaldb tool like the following:
sqllocaldb info v11.0<ENTER>
When I run that command I see that the instance is running and the named pipe is:
C:\Visual Studio 2013\Projects\TaskFlow>sqllocaldb info v11.0
Name: v11.0
Version: 11.0.3000.0
Shared name:
Owner: \roger
Auto-create: Yes
State: Running
Last start time: 8/14/2017 11:30:03 AM
Instance pipe name: np:\\.\pipe\LOCALDB#CACCCF57\tsql\query
I copy that name and paste it into SSMS like the following:

Click the [Connect] button and you’ll be able to use SSMS to interact with the database.

SqlCmd : Command-Line Tool
I like to use SqlCmd to script my entire database creation and load. It’s quite easy but there are a couple of challenges related to Sql Express (Sql engine) version.
That’s because the old SqlCmd won’t work with newer versions of the Sql Express engine and when it fails you get a bit of an odd error. Once I show you that error you’ll know what is going on and have no problem.
Visual Studio 2017 & Pathing
Because I have Visual Studio 2017 on my system there is a Sql Express 2016 engine v13.0.1601.5 running on my machine.
However, I’m not sure why but command-line tools still point to an older version of SqlCmd. That means when I open the normal command prompt and try to connect to my LocalDb named MSSqlLocalDb then I see an error which looks like the image below. I am using the following sqlcmd to attempt to connect:
sqlcmd -S (LocalDb)\mssqllocaldb<ENTER>

That’s a very bad error because it is a red herring (something that misleads or distracts from a relevant or important issue). The error message has nothing to do with the actual problem that occurred.
The error message actually occurs because my path variable is pointing to an older version of the sqlcmd tool.
Where Is SqlCmd Normally Found?
You will normally find the sqlcmd utility one of of two locations:
%ProgramFiles%\Microsoft SQL Server\110\Tools\Binn\
The one that works for all of my SQL Express engines is at:
C:\Program Files\Microsoft SQL Server\110\Tools\Binn\
It is odd that the one I had at the following location didn’t seem to work properly.
C:\Program Files\Microsoft SQL Server\120\Tools\Binn\
My point here is, if you get the odd error message above, you’ll want to make sure you’re :
- using the correct format for the connection string : (LocalDb)\<db instance name>
- pointing at the correct version.
Once you connect successfully you will see a prompt something like the following:

That’s the SqlCmd prompt attempting to indicate that you are connected successfully to the database.
How Do You Use SqlCmd to List Available Databases?
To list the available databases, we need to run a MS SQL system stored procedure. Type the following commands:
sp_databases;<ENTER>

go<ENTER>
Make sure you remember that semicolon. A semicolon indicates end of a command to SQL and it is necessary with SqlCmd tool. Also, notice that there is not a semicolon after the go command.
Once you type go and hit <ENTER> you’ll see the following:

You can see that our taskflow database is running in this instance. Of course, there are a few default databases also included (msdb, tempdb, etc).
How Do We Switch To A Database So We Can Query It?
We can apply the use command. Type the following to switch to the other database:
use taskflow;<ENTER>

go<ENTER>
When you run that command properly you will see a result like:

Now we can select from our task table using the following command:
select * from task;<ENTER>

go<ENTER>
Exit SqlCmd
To exit sqlcmd you simply type :
exit<ENTER>
That will place you back at the normal command prompt.
Automate Using SqlCmd
Now, let’s take a look at how to use SqlCmd and a batch file to:
- create a new table in our taskflow database
- insert data into that table
- query the database and print a result that shows us that our inserts worked as expected.
Before I show you the simple scripts, let me explain how this can be helpful for devs.
How Is This Helpful?
You can use this method to create your entire database and all tables and stored procs and then load all your tables with baseline data. Then as you do your development if you need to get back to the baseline data you can just delete the database and run it all again.
This is also great so you can share a baseline database with any other testers or devs on your team that they can use locally and not corrupt everyone else’s data.
Script Explanation
The first script (SQL DDL — Data Definition Language) file we need is the one that creates the new Project table.
Download From Top of Article
I’ve added another zip file (CreateAndLoadProjectTable.zip) at the top of this article. Download that zip now and take a look inside. There are three files I’ll display here:
- ProjectTable_Create.sql — DDL for Project table creation
- ProjectTable_DataInsert.sql — DML (Data Manipulation Language) to
inserttwo new rows into the Project table - createAndLoadProjectTable.bat — batch file which you run which runs SqlCmd and uses the other two files to create the table and load the data.
Let’s take a look at what is in each of those files and talk about them a bit.
The first one is simply the Project table creation script.
CREATE TABLE [dbo].[Project]
(
    [Id] INT  IDENTITY(1,1) NOT NULL PRIMARY KEY,
    [Name] VARCHAR(200) NOT NULL,
    [Title] VARCHAR(150) NULL,
    [Description] VARCHAR(500) NULL,
    [Notes] VARCHAR(MAX) NULL,
    [Created] DATETIME NOT NULL DEFAULT getdate(),
    [Updated] DATETIME NULL,
    [Active] BIT NOT NULL DEFAULT 1
)
The second one has two insert statements in it. It’s just like the normal SQL you might run manually. Here we’ve also added a go statement after each one so that if on statement fails then the other will still run.
insert into Project (Name,Title,Description,Notes) values
('Delta Epsilon','First Test Project',
'Software to determining differences of negative space in drawings.',
'This is the first test project.');
go
insert into Project (Name,Title,Description,Notes) values
('Bravo Alpha', 'Second Test Project',
'Software to allow alpha particle changes.', 'This cannot be explained.');
go
Finally, the last one is the batch file which puts it all together and runs SqlCmd for us.
CAVEAT: Please note that I’ve included the absolute path to my copy of SqlCmd. This could be incorrect for your machine and you may not need the full path at all.
CAVEAT2: Please note I’m connecting to the v11.0 database on my machine. That may not be correct on your machine. Please change those items if necessary.
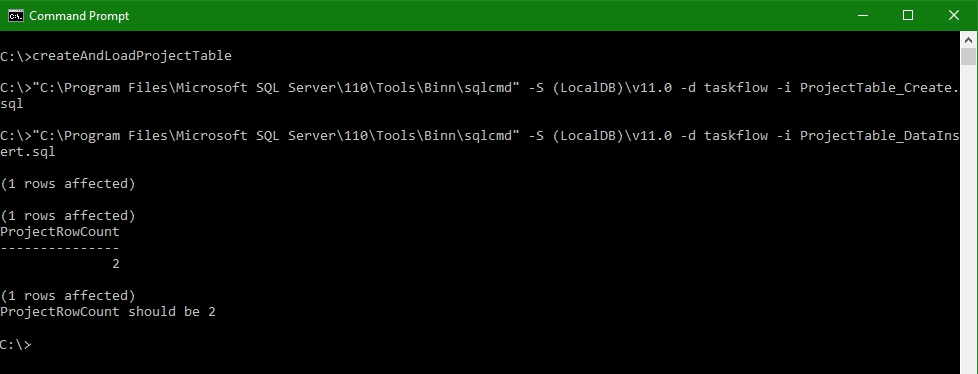
"C:\Program Files\Microsoft SQL Server\110\Tools\Binn\sqlcmd" -S (LocalDB)\v11.0 -d taskflow -i ProjectTable_Create.sql
"C:\Program Files\Microsoft SQL Server\110\Tools\Binn\sqlcmd" -S (LocalDB)\v11.0 -d taskflow -i ProjectTable_DataInsert.sql
@echo off
"C:\Program Files\Microsoft SQL Server\110\Tools\Binn\sqlcmd" -S (LocalDB)\v11.0 -d taskflow -E -Q "select count(*) as ProjectRowCount from Project;"
echo ProjectRowCount should be 2
@echo on
Let’s go through the functionality of each line so you can understand what is going on here.
The first line of the batch does the following:
- runs
SqlCmd - connects to (LocalDb)\v11.0 instance of the database (using -S (Server))
- opens the taskflow database (using the -d and the name of the database
- uses the input file ( -i ) named ProjectTable_Create.sql — which creates the project table in our database
The Second line does all of the same except it uses the ProjectTable_DataInsert.sql file which contains the insert statements to add the data.
The third line of the batch uses a DOS command to turn off the echoing of commands for a moment — just to clean up the output (I’ll show you that in the next image).
The fourth line connects using SqlCmd again but this time we want to run a query that looks like:
select count(*) as ProjectRowCount from Project;
We do that to get a count of the number of rows in the Project table in an effort to determine if our inserts succeeded.
The fifth line simply echos a message so we know what we are expecting.
The final line turns the echo command back on so that when you type at the command prompt it will work normally.
Here’s what it looks like when you run the batch file successfully.
That’s it. You can get more information on running SqlCmd by typing the following at the command prompt:
sqlcmd -?<ENTER>
Now you should be able to create your own scripts to rebuild your entire database and load it with data.
Summary
I’ve walked you through a bit of the tools surrounding Visual Studio, Sql Express, LocalDb showing you the connections from a number of viewpoints. I hope this helps you use LocalDbs for easier testing and dev.
